Aşağıda bilgileri bulunan kontrol kutusu ve projeksiyon kullanımı Y Blok ta bulunan cihazlar için geçerlidir.

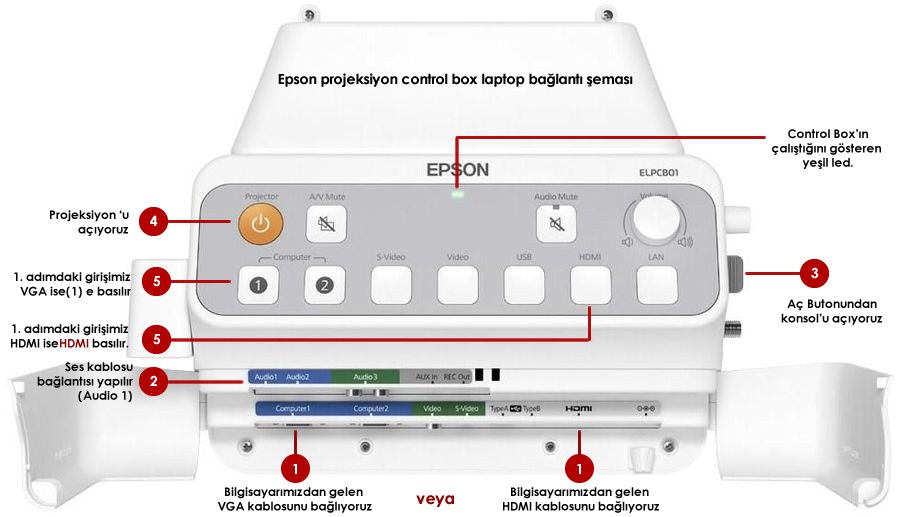
Not: Tüm bağlantılar yaptıktan sonra bilgisayarı açıyoruz. Bu işlemleri yaparken bilgisayarımız açık ve görüntü gelmiyor ise laptop markasına göre Fn+F5, Fn+F4 veya Fn+F7 tuşlarına basmanız gereklidir.

Epson projeksiyon için 3 adet yazılım kurmamız gereklidir. Bu yazılımlar şunlardır;
Kablosuz bağlantı ile görüntü aktarımı programı
* Epson projeksiyon için yüklediğimiz bu yazılımların sonucunda Easy Interactive Araçları için aşağıdaki dokümanı indirip 110 ile 148. sayfalar arasında bulunan Easy Interactive Tools eğitiminden faydalanabilrsiniz.
Epson Projeksiyon USER GUIDE
* Epson EB-485Wi, EB-585Wi, EB595Wi projeksiyona dizüstü bilgisayarımızdan kablosuz olarakta bağlanabiliriz. Bununla ilgili EasyMP OperationGuide dokümanından faydalanabilirsiniz.


* You may download the necessary softwares for Epson EB-485Wi to install into your computer via the link below.
Wireless access screen-share program
You may benefit from the Easy Interactive Tools Training which is between the 110-148 pages of the Easy Interactive Tools Devices that you will download its document below.
Epson Projection USER GUIDE
* You may connect to your Epson EB-485Wi Projection Device with wireless connection from your laptops. You will find the necessary information in the EasyMP OperationGuide about it.
USING EPSON PROJECTOR WITH Epson iProjection SOFTWARE
You can give a presentation with our Android or smart phones via Epson smart boards to do that, you need to download “Epson Projection” software from Apple Store or Android Market. After that step, when you run the program, look for the code for the projector from the settings ( each projector’s code is the classroom number. e.g Y404), and add the number to your phone. Then, you enter the code given by the projector to the settings, and transfer thedisplay on your phone to the projector.

Present wirelessly from your iPad, iPhone or iPod Touch with the free app from Epson.
With Epson iProjection, Epson has made it even easier to wirelessly present images and documents whether you’re in the office, classroom or on the move using a supported Epson projector. Simply download Epson iProjection from the App Store and using an HDMI or wireless connection, you can easily access and project JPEG or PNG images, MS Office documents, PDFs and Keynote.
Epson iProjection also features an embedded remote control, allowing you to locate compatible projectors and input sources, adjust and mute the volume, freeze and control the display, and more.
Which iOS version does Epson iProjection support?
Epson iProjection requires iOS version 4.2 and later.
Which iOS devices are supported?
Epson iProjection is compatible with iPad, iPad2, iPhone 3G, iPhone 3GS, iPhone 4, iPhone 4S, iPhone 5 and iPod touch (third generation and later) models.
Which languages are supported?
Epson iProjection supports English and Japanese (iProjection version 1.0.0).
What file formats can be projected using the app?
You can project all main file formats:
- Project JPG and PNG format photos stored in your ‘Photos’ library.
- Project documents in Word (.doc, .docx)*, Excel (.xls, .xlsx)*, PowerPoint (.ppt, .pptx)*, Keynote (.key) and Adobe PDF formats.
Cloud file services such as Dropbox or email accounts (duplicated files only) are also supported.
Note:
*Only files created in Office 2003 and later.
Video playback, mirroring, PowerPoint and Keynote animations are not supported.
How do I project using Epson iProjection?
Epson EB-485Wi Google Play Store
Epson EB-485Wİ Apple Store
Do the following:
- Enable Wi-Fi on your iPhone, iPad or iPod touch and connect to the projector. Alternatively, connect your iOS device to the projector using a compatible HDMI connector cable.
- Infrastructure: Connect your projector to your wireless network; then, connect your iOS device to your wireless network (go toSettings > Wi-Fi > Wi-Fi Networks). Your device must be connected to the same network as the projector.
- Ad hoc: Set an IP address on your projector via the EasyMP menu. This is a manually assigned IP address (not DHCP), e.g. 172.17.17.0. Then, connect your iOS device to the wireless projector in Settings > Wi-Fi > Wi-Fi Networks, tap Other, enter the IP address you assigned to the projector, and tap Find.
- Open Epson iProjection.
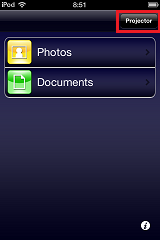
- Tap Projector in the top corner of the screen.
- Select your projector from the list; for an Ad hoc connection, tap Other and enter the IP address.

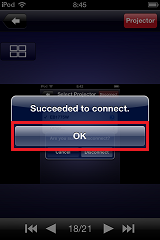
- Tap OK to connect to the projector.
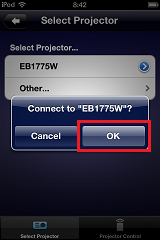
- You will see a confirmation message when it successfully connects to the projector, tap OK to continue.
Note:
- You will only need to do this once per session. (You will need to repeat this step if you want to connect to a different projector or if you have previously force quit the app.)
- If the connection is unsuccessful, check your network settings and make sure the projector is powered on.
- To connect to a projector by specifying its IP address, select Other and enter the IP address.
- You can disconnect from the projector by tapping Disconnect from the top-right corner.
7. Choose either Photos or Documents.
8. Tap the folder that contains the file you would like to project (or your ‘Photos’ library for PNG and JPG images), and then tap the file to select it.
9. The file will be projected. If you have an iPad, you can access further display settings using the Settings button.
10. To project another file, browse the files and photos on your iOS device, and tap the file to project it.
How can I access the embedded remote control to change the input source, adjust the display and volume or control other functions?
- Tap Projector in the top-right corner.
- On the ‘Select Projector’ screen, tap Projector Control.

- You will now be able to access the control functions for your projector (the available source and control options may vary depending on your projector model).

Why does Epson iProjection prompt me to enable location data when I want to display a photo?
When you try to display photos, the EPSON iProjection app may prompt you to enable Location Services. This is standard requirement of iOS as location data may be associated with your photos.
As a feature of the camera on your iPhone or iPad, every time you capture a photo, it will save GPS data to the file so that other applications (such as iPhoto) can show where the photo was taken. When you attempt to display the photo in Epson iProjection, both the photo and associated file data is accessed. However, Apple requires owners to authorise access to its location services. Tapping OK will permit Epson iProjection to access Location Services as needed and display your photos.
You should not be prompted to permit access to Location Services again, but you can check the permissions for iProjection and other apps in Settings > Location Services.